
A handy little stitch, the slip stitch - but when used to finish the final round of a motif or project, it can skew the edge just a little bit out of shape.
How does this happen? Well, in the normal course of things, one crochet stitch flows into the next, with nary a break between 'em. The joining slip stitch, however, inserts a stitch - and, when tied off, a knot - which creates a tiny bump or bulge at the edge of your carefully crocheted motif or hat.
But rounds must be closed. Yarn must be tied off. Is there no way around this pesky slip stitch? Yes, there is! Enter the Invisible Join (trumpets tooting, crowds cheering and waving hooks, yarn snippets drifting down like confetti).
I'm a big fan of the Invisible Join because it's just that - invisible. It creates the illusion of a seamless edge, and it's very quick and easy to do.
Here are the basics of an Invisible Join:
Note: Invisible Joins can be made using a tapestry needle OR a crochet hook several sizes smaller than your project hook. (I like to use a crochet hook, since it doesn't need threading.)
When you complete the final stitch of your round, cut yarn, leaving a 2" tail:
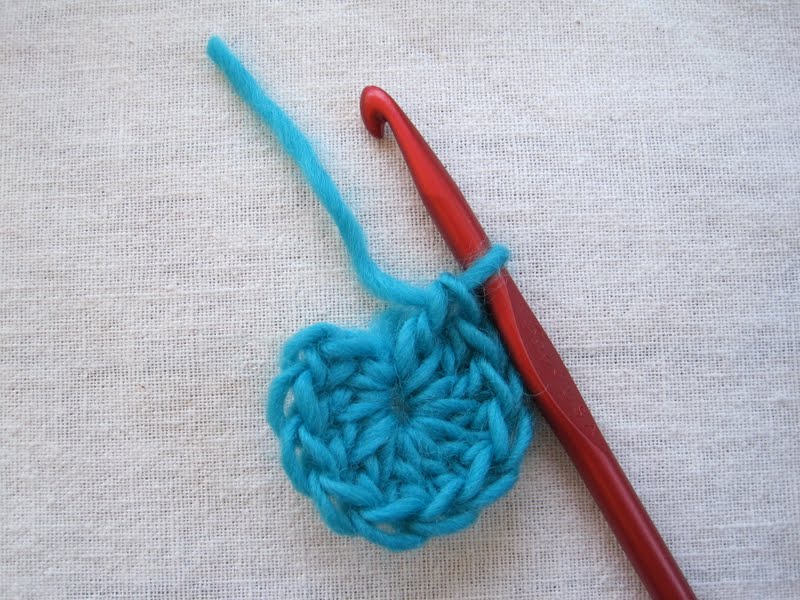
Gently pull the yarn tail up and out of the stitch:

Insert hook from back to front of the stitch you're connecting to (see Notes below on which stitch to choose):

With hook (or needle), gently pull the yarn tail through.

Now turn your work around so that the reverse is facing you. Insert hook, from bottom to top, through the back loop of the final stitch (where the yarn tail came from in the first place). If there is more than one horizontal strand on the back of the stitch, insert hook through at least two of them (see Tip below for more details):
 |
| Up through the back horizontal strands |
Gently pull the yarn tail down and through. That's it!

Turn your work over and admire the seamless edge. Pretty cool, huh? Now you can weave in that yarn tail, and no one will ever know which stitch was the last.

Tip: Normally, invisible join instructions tell you to bring the yarn tail down through the top back loop only of the final stitch. This works just fine - but I like to take it a step further. (You've heard of OCD? Obsessive Crochet Disorder? I've got it bad.)
For a stronger join that truly mimics the stitches around it, first think about the final stitch - the one you made right before the invisible join. When making that final stitch, how many loops did you pull through at the very end of the stitch, after the final yarnover? (For a single, double, or triple crochet it would be 2. For a half double crochet, it would be 3.) So, when finishing the invisible join, bring the yarn tail down through that same number of strands.
For example: if your final stitch was a double crochet, and you want your invisible join to truly mimic a double crochet, pull the yarn tail down through 2 back strands of your final stitch - because that's how many loops you pulled through to finish the double crochet.
To make the illusion complete, take the yarn tail through at least one vertical bar of the next stitch over. This will eliminate any gaps between your final stitch and your first stitch.
 |
| Finally, take yarn tail through at least one vertical bar of the next stitch over. |
Notes:
Now that you've got the basic technique, let's take it a bit further. To which stitch should you connect an Invisible Join? It's really up to you; but here are some guidelines:
When you want to maintain an exact stitch count, you should:
Connect your Invisible Join to the second stitch away from your final stitch. (I call this the Formal Invisible Join.) Why skip over a stitch? The Invisible Join may be invisible, but it's still a stitch; if you insert it between two stitches, it will add 1 to your count. By skipping over a stitch, you maintain the exact number of stitches you started with.
Remember not to pull too tightly on your Invisible Join, especially when skipping over a stitch. You want it to lie right on top of the stitch you're skipping, and match its size.
I used this technique in the Marigold Hat, Round 20 of the crown:
 |
| Skipping over a stitch (to maintain stitch count) |
When stitch count doesn't matter, as at the final edge of a glove or hat, you can:
Connect your Invisible Join to the next stitch over - if you want to, and if it looks alright. (It's really a matter of trial and error, and doing what works best for the project in hand.)
This join worked well for my Wickerwork Mitts:
 |
| Connecting to the next stitch over (where stitch count is not important) |
When your round starts with a cluster, you should:
Chain 1 less than you normally would to start the round/cluster, and when the round is complete, connect your Invisible Join to the top of the cluster (which counts as the second stitch - making this a Formal Invisible Join).
For example, the Pennies & Lace Block, Round 2:
 |
| Connecting to the top of a 2-dc cluster. (Cluster was started with a ch-2, NOT ch-3.) |
When making circular motifs, you can:
Chain 1 less than you normally would* to get the yarn up to the required height. (I use chain 1 for single crochet and half-double crochet; chain 2 for double crochet.) Counting these chains as the first stitch, make the rest of the stitches called for (for example, if the pattern calls for 12 dcs: start with a chain 2, then make 11 dcs). Connect the Invisible Join to the top of the first "real" stitch, skipping over the top of the beginning chain(s). (Another variation of the Formal Invisible Join.)
*If your chains tend to be very tight and short, then use whatever amount works best for you.
An example of this can be found in the Pennies & Lace Block center.

 |
| Chain 2 + 11 double crochets + 1 invisible join = 12 stitches! |
The Invisible Join is fast and easy, and can greatly improve the look of your in-the-round crochet. Once you start using it, you'll find that it has all sorts of useful applications.
If you have any questions, feel free to ask using the comment box below.
Thanks for viewing this Visible Post, and happy Invisible Joining!
~ ~ ~ ~ ~ ~ ~ ~ ~ ~ ~ ~
Your invisible join guidance is excellent. I used it for the "Pennies and Lace" project and it truly looks so much better. Thank you for sharing. :-)
ReplyDeleteThanks for the How-To!! ~tina
ReplyDeleteAnother wonderful tutorial. I have to admit that I need to rearrange my brain a bit, as I am a left handed crocheter. I am a right handed knitter...this explains my weirdness!
ReplyDeleteOh my goodness...aren't you the clever one!!!Thanks for sharing your tutorials. This surely will come in handy for me! Shari:)
ReplyDeleteThank you for all your crochet tips, they're really helpful. I like the knotless chain and the invisible join in the round. I have yet to try the knotless standing stitch. Your photos are really helpful!
ReplyDeleteGreetings, Sandra
Thank you for sharing I'm 66 years old and still learning!
ReplyDeleteJoyce
You're welcome. I'm ... very close to 50 (ahem) and still learning too. :)
DeleteI just tried this invisible join and it looks great. Thanks so much for sharing.
ReplyDeleteBarbara
You're welcome. It really is a helpful stitch to have in your crochet arsenal. :)
DeleteI have read this before but I keep forgetting to do it. Since My hands automatically just make a know and cut and then when I am trying to hide the knot I think "oh crap I didn't want to do that" Then I think " I will make the invisible knot next time..." And still don't. LOL I hope I can actually use this sometime.
ReplyDeleteYou can always undo those knots, you know. (I sometimes do the same thing but then I just pull the knot loose and fix it.) Thanks for commenting, Bridget! :)
DeleteThis is EXCELLENT!
ReplyDeleteThanks, Tracy! (You have a great name for a crocheter.) :)
DeleteAwesome tip - thank you!
ReplyDeleteYou're very welcome! :)
DeleteThanks for the helpful tip!! I knew the rounds where I changed yard color were coming out better, not such a noticeable join, but didn't want to cut my yard when using the same color. Now I see what a difference this technique will make! Thanks again!
ReplyDeleteYou're welcome. :)
DeleteFor continuing rounds of the same colour, it's very hard to eliminate a visible seam or stitch line running up the piece. I sometimes slip stitch each round closed, then chain up and start each new round in the second stitch of the previous row (which places the final stitch of the round in the joining slip stitch from the previous round). This gives me a diagonal seam - less obvious, but still visible. (See the Wickerwork Mitts for an example of this.) For truly seamless rounds, you need to work in a spiral or cut and join each round separately.
Whew! That was a long reply. :)
Thank you. Your tip is so helpful.
ReplyDeleteYou're very welcome. :)
DeleteHow wonderful! That unsightly knot and disfigured edge was quite the thorn until now. Thank you so much for sharing your expertise!
ReplyDeleteVery helpful..
ReplyDeleteWow! I've always hated that bump!!! Thank you so very much for your help. And the tutorial was easy to understand. :-) Happy crocheting!
ReplyDeleteNot only is your tutorial clearly informative... it's quite entertaining. Thanks! =)
ReplyDeleteSo what you are saying is that for each round of a multiple round project, you must cut the yarn to finish off each round, even if you are working with the same color yarn throughout the project?
ReplyDeleteYes - which places this technique firmly in the OCD (Obsessive Crochet Disorder) category. For some less obsessive alternatives, check out these posts:
Deletehttp://mrsmicawber.blogspot.com/2014/04/the-problem-of-telltale-seam-in-crochet.html
http://mrsmicawber.blogspot.com/2014/04/mrs-ms-mock-invisible-join-new-crochet.html
Good luck and happy crocheting! :)
pure genius !
ReplyDeleteGreat tips. Thanks. Question: what would you do for invisible join if the last two stitches in the round are chain stitches and the first two stiches of that round are a chain 3 for the dc plus chain 1....
ReplyDeleteOkay - had to take a minute to visualise this! You could do it one of two ways:
Delete1. Eliminate the final chain stitch and replace it with the Invisible Join (which of course creates a stitch). In other words, ch 1, cut yarn, join with inv join to top of ch-3. Then you'd want to take the yarn tail back to the right, through the back ridge of the top ch of the ch-3, then probably weave it down from there. (The reason for taking the tail through the stitch to the right is to mimic the back bar of a regular chain stitch.)
OR,
2. Ch 2, cut yarn, join with inv join to ch-1 (just past the ch-3). The join would sit right on top of the ch-3, pretending to be part of it. Then you can weave the tail wherever you like.
The Inv Join does work for lacey crochet - it's mostly a matter of deciding how and where you want to join. You can even plan ahead and alter the first stitch of the round to something just a bit shorter (if you like) to make room for the inv join. Hope that makes sense!
:)
I taught myself how to crochet last year and was always googling the best way to join rounds & finish off. Then I found your tutorials! So happy I did. I've made two cowls using the mock invisible join and I love them, though the second one I lost about 3 stitches by the end and I have no idea how!?
ReplyDeleteFor finhshing, I have yet to try this until today. I worry it won't be "sturdy" enough to hold. For some reason the knot makes me feel a bit more secure that it won't unravel a month down the road. Have you had any problems with this happening? Or should I stop being a worrier and just do it?! :) thanks so much!!
Hi Claire - no, I haven't had any problems with the join coming undone. You still need to weave in the yarn tail, even after completing the join, so that's where the real security comes in. For the most secure weaving in, I like to take the yarn tail under some other stitches (working on the WS of the fabric), then loop it over one strand of the project and come back through the yarn tail towards the place where I started. (This technique really only works with a needle.) If the yarn is super slippery, I'll make another turn and take it back through itself again before cutting it.
DeleteGood luck with your joins!
ReplyDeleteThank you. I only just discovered this yesterday. Had to try it today. So fantastic!
You're very welcome! :)
DeleteThis is an excellent tutorial! Thanks for taking the time and effort to share it.
ReplyDeletehI!
ReplyDeleteGreat! Cud u use this for a flat surface item such as a washcloth or dishcloth - I've noticed some patterns call for an invisible join once finished. Tks for yr help.